- 欢迎来到Minecraft插件百科!
- 对百科编辑一脸懵逼?帮助:快速入门带您快速熟悉百科编辑!
- 因近日遭受攻击,百科现已限制编辑,有意编辑请加入插件百科企鹅群:223812289
TerrainControl:修订间差异
(→中期讲解) |
|||
| 第393行: | 第393行: | ||
==== 基本的自定义生物群系 ==== | ==== 基本的自定义生物群系 ==== | ||
此页重点介绍创建和编辑生物群落的基础知识,包括更改地面和水、 矿石、 树/植物的生成以及山/坑的生成。ReplacedBlocks 特性的信息,请使用 CustomHeightControl 等更难一些的功能,比如说瀑布(建设中)。 | |||
生物群落区的编辑和设置可以分成四个主要部分: 生物群落区位置、 地形形状、 生物群落区的实体数量和外观。有关更多生物群落的生成位置信息请参阅 [https://github.com/MCTCP/TerrainControl/wiki/Basic-world-customization 本教程]。 | |||
===== 地形形状 ===== | ===== 地形形状 ===== | ||
地形的形状被一大堆变量所控制。你可以改变它的高度,有多不平坦(即丘陵),多少空气要被填充为水。地形的形状是计算地形之后,地形控制器所要过的第一道关口。 | |||
====== 地形高度 ====== | ====== 地形高度 ====== | ||
其中确定生物群落高度的第一个和最重要的变量是 BiomeHeight 。这个变量依赖在 worldconfig 中的WorldHeightBits 设置。Minecraft 将它生成的地形高度划分为相等的正负值与以及BiomeHeight设置为 0.0 代表中间。在默认设置 (WorldHeightBits:7) 的地形将生成达 128 的高度,将把 BiomeHeight:0.0 放在 y = 64的位置。如果 WorldHeightBits 更改为 8 ,高度就会成为 256,然后每个关于高度的设置,其效果大致增加一倍。BiomeHeight:0.0 将会成为 y = 128的位置,加大到 0.1 将双倍地对 WorldHeightBits:7 产生影响。把WorldHeightBits提高为8,会使得地形生成最多 256的高度。如果将WorldHeightBits 降低,将会产生相反的效果,每一次降低会使地形生成最大高度减半。WorldHeightBits 为6也不能使地形高64左右。提示:这两个变量不会有效果如果控制器被设置为OldGenerator(此设置在[https://github.com/MCTCP/TerrainControl/wiki/WorldConfig WorldConfig]里面)。 | |||
改变 ExtraBiomeHeight 将会以“8乘以它的值”的次数来创建悬崖。改变 ExtraHeightConstrictWaist 可以确定悬崖的生成。保持它的数值在-0.4和1.0之间。大于 1.0 可以导致悬挂和漂浮的地形。负值会导致中部地区 (4 x ExtraBiomeHeight) 扩大。降低到 -0.4 以下可以创建地下的巨大洞穴。 | |||
下表可以帮助确定基于WorldHeightBits 为 7 和 8的高度设置。不要使用-2.0 作为 BiomeHeight 的设置,因为这是BUG。此外请注意地形不会生成最大的256 高度,它将停止在 255,如果在此之前没有别的方块。 BiomeHeight 可能会是-10 到 10 之间的任意值,虽然低于/高于-4/4 的任何值没有任何其他的效果了。 | |||
{| class="wikitable" | {| class="wikitable" | ||
|- | |- | ||
| 第447行: | 第448行: | ||
|} | |} | ||
====== | ====== 地形波动率 ====== | ||
有很多的设置来调整有多少丘陵(换句话说,就是多么的不平坦)。其中最重要的是 BiomeVolatility。它增加将使地形成为一个多山的地形。0.0 使地形几乎变成超平坦。1.0 会给你小山。2.0 出现了悬崖。就像 BiomeHeight 一样,如果 WorldHeightBits设置为8,它的效果将会翻一番。此设置不能在 TerrainMode:OldGenerator模式下启用。 | |||
===== | ===== 生物群系的实体数量 ===== | ||
During the second pass of terrain generation the biomes are populated with resources like ores, trees, custom objects, flowers, tall grasses and small ponds above/below sea level. After this is done, biomes with a low BiomeTemperature will be covered in snow. | During the second pass of terrain generation the biomes are populated with resources like ores, trees, custom objects, flowers, tall grasses and small ponds above/below sea level. After this is done, biomes with a low BiomeTemperature will be covered in snow. | ||
You can find all resources in the [https://github.com/MCTCP/TerrainControl/wiki/Resources-queue Resources queue]. | You can find all resources in the [https://github.com/MCTCP/TerrainControl/wiki/Resources-queue Resources queue]. | ||
===== | ===== 外观 ===== | ||
There are things that haven't got anything to do with terrain generation, but that you still want to change. For exampe, uou can edit the colors and weather of the biome. Sadly, the vanilla singleplayer client will ignore all those settings. It will also display custom (non-vanilla) biomes with the colors and weather of the plains biome. Players will need to install the Forge version of Terrain Control to fix this. | There are things that haven't got anything to do with terrain generation, but that you still want to change. For exampe, uou can edit the colors and weather of the biome. Sadly, the vanilla singleplayer client will ignore all those settings. It will also display custom (non-vanilla) biomes with the colors and weather of the plains biome. Players will need to install the Forge version of Terrain Control to fix this. | ||
2016年3月5日 (六) 02:18的版本
| 外文名 | TerrainControl |
| 插件类型 | Spigot / CraftBukkit |
| 最新版本 | v2.7.2 |
| 兼容服务端 | 1.7.2-1.8.3 |
| 前置插件 | 无 |
| 源地址 | http://dev.bukkit.org/bukkit-plugins/TerrainControl |
概述
Terrain Control 是一款高级的地形生成器. 通过多样化的配置文件,它使得用户可以在不了解Java的情况下,而控制Minecraft地形生成机制的大多数方面. 它可以运行在Bukkit/Forge服务端以及带有Forge的单人游戏上. Terrain Control 继承自旧版的 PhoenixTerrainMod, 而其又是基于著名的 BiomeTerrainMod. Terrain Control 由Khoorn维护 (同时也是Github上的 Wickth ).
- 控制水平与垂直方向的地形生成噪声函数
- 控制每个生态群系的地形生成高度以及波动性
- 由图像生成生态群系图
- 控制生态群系,岛屿和大陆的规模
- 自定义生态群系
- 众多关于洞穴与峡谷的设置项
- 控制自然结构的生成,诸如天然矿井、要塞和村庄
- 对矿物、植物、地牢、池塘和其他生成物的完全控制
- 自定义树木和其他对象(BO2 以及 BO3)
- 替换方块
- 支持视觉设置,如设置树叶的颜色 (需要客户端也安装TerrainControl)
想了解更多,来这里看看吧!
向导
准备工作
安装向导
时间: 2014.1.5 Terrain Control 插件支持CraftBukkit, Spigot, Cauldron and Forge (甚至单人游戏). 一个普通的jar文件可以在所有这些平台上面运行.
- Forge (单人游戏)
首先, 下载并且安装Forge. 运行一次Minecraft以确保所有文件正常运行. 然后通过百科主页面上的下载链接下载插件. 确保和Minecraft本体的版本对应.把文件放进.minecraft文件夹下的mods文件夹.
你现在可以创建一个Terrain Control所定义的世界类型.这个 Mod 只会影响到这一个世界与这个世界的类型. 如果你没有更改在 .minecraft/mods/TerrainControl/worlds/YOUR_WORLD_NAME/ 里面的配置文件, 世界只会成为一个默认的Minecraft世界. 每当你改变了配置, 你必须删除 .minecraft/saves/YOUR_WORLD_NAME/region 文件夹来重新生成世界. 被更改的设置不会影响到已经生成的区块. 向导会教给你如何自定义一个世界类型.
- CraftBukkit, Spigot 和 Cauldron 服务器
只需要把jar文件丢尽plugins文件夹,就像其他的Bukkit插件一样. 这并不需要在玩家的客户端上安装相应的单人游戏版本, 但是如果安装了可以体验到更多的特性.
在你安装完成之后, 你必须仍然为你的新世界激活这个插件. 如果你没有一个多世界管理插件类似于Multiverse, 下面给你的 bukkit.yml 来允许插件操作这个世界 (使用空格按钮, 不要使用 tabs!):
worlds:
  你的世界名称:
    generator: TerrainControl
如果你使用了 Multiverse, 你可以创建一个Terrain Control 类型的时间通过使用命令:
/mv create 世界名称 normal -g TerrainControl
如果你正在使用多世界插件来应用Terrain Control 来更改你的一个默认类型的世界, 也要增加 Terrain Control 到 bukkit.yml (操作:上面描述过). Terrain Control 需要正确的将这个世界初始化为默认世界. (鉴于本人水平,本语段可能出现了歧义) 如果你在使用另一个多世界管理插件, 查找该插件的介绍文档. 使用 TerrainControl (没有一个空格在 Terrain 和 Control之间) 作为控制者名称(即generator 后面填的).区分大小写.
如果你没有更改在 plugins/TerrainControl/worlds/YOUR_WORLD_NAME/ 文件见下的配置, 世界只会成为一个默认的Minecraft世界. 每当你改变了配置, 你必须删除 .minecraft/saves/YOUR_WORLD_NAME/region 文件夹来重新生成世界. 被更改的设置不会影响到已经生成的区块. 向导会教给你如何自定义一个世界类型.
- Forge服务器(也就是官服)
确保Forge安装到了服务器. 把插件放进mods文件夹. 去 server.properties 文件然后设置level-type 到 TerrainControl (没有一个空格在 Terrain 和 Control之间). 删除主世界的 level.dat 来得到一个正确的世界类型.
如果你没有更改在 .minecraft/mods/TerrainControl/worlds/YOUR_WORLD_NAME/ 里面的配置文件, 世界只会成为一个默认的Minecraft世界. 每当你改变了配置, 你必须删除 .minecraft/saves/YOUR_WORLD_NAME/region 文件夹来重新生成世界. 被更改的设置不会影响到已经生成的区块. 向导会教给你如何自定义一个世界类型.
准备工作向导
欢迎,新的使用者!
在你成功的安装Terrain Control之后, 你可以开始创建你的新世界. 创建一个创造模式的世界(TerrainControl作为控制者),世界的种子需要是”12”. 我们使用这个特定的种子是为了使你的世界与教程所介绍的相同.如果你不需要创建一个TerrainControl世界使用这个特定的种子,只需要跳过这个列表.
- 如果你是单人游戏, 左键创建新的世界按钮, 选择创造模式作为游戏模式然后填写一个名字. 左键更多世界选项按钮, 把种子改成12然后选择 TerrainControl 作为世界类型. 确保打开了允许作弊, 你需要使用 /tp 命令.
- 如果你在 Bukkit 服务器上然后你有 Multiverse 多世界插件,你可以使用 /mv create world_name NORMAL -s 12 -g TerrainControl 来创建世界然后使用 /mv tp world_name 来传送到这个世界.
- 如果使用的是另外一个多世界管理插件而且使用的是Bukkit服务器.查询多世界插件的帮助文档.创建一个新世界记得把12作为世界的种子,将TerrainControl作为世界类型.
- 如果你在使用Bukkit服务器但是没有任何多世界管理插件,去 bukkit.yml 然后再增加下列内容:
worlds:
 你的世界名称:
   generator: TerrainControl
记得把 “你的世界名称” 改为你所习惯的世界名称. 而且,在文件里面不要使用tab键,只能使用空格键.前往 server.properties 文件然后将 level-seed 设置为12.删除整个世界文件夹来得到一个全新的 level.dat 文件含有正确的种子.
- 如果你使用的是Forge服务器(官服), 前往 server.properties 然后设置 level-type 为TerrainControl 然后 level-seed 为12. 删除整个世界文件夹来得到一个全新的 level.dat 文件含有正确的种子.
现在登陆一次你的世界让 Terrain Control 生成全新的配置. 使用命令 /seed来验证种子是12. 你会注意到这个世界和默认的Minecraft世界没有任何区别: 别忘记你还没有更改一点点配置文件哟! 关掉你的服务器/游戏吧.
找到你的Terrain Control 设置文件夹.Locate your Terrain Control settings folder. (如果不知道在哪儿可以参考安装说明嘤). 你应该可以看到一些类似于这样的东西:
让我们打开 WorldConfig.ini. 使用Notepad 当然很好哦. 但是不要使用含有字体样式的编辑器哦,比如说Word.
带有 # 开头的行为注释。注释对每一个变量进行了解释。在Wiki的WorldConfig页面上,你还可以找到更多的信息。
译者注:今后的“region”文件夹统一译为区块文件夹
为了验证所有的东西都正常工作,我们来更改一个数值试试。GenerationDepth是个好东西来更改。如果你把它设置成9,所有的生物群系大小减半(仅仅是x和z两个方向,就是说高度还是原来的).如果你设定为了11,所有的生物群系大小翻倍,同时也只是在x和z两个方向。 如果你设置为12,那么生物群系的大小将会变得和“巨型生物群系”世界类型的生物群系大小一样大。让我们试试,把它改成12,然后保存。
如果你愿意(重新)打开游戏/服务器,你依然看不到任何变化。你必须探索新的区块来查看新的地形,和其他的控制器(如WorldEdit)别无二样。这实在是很无聊,但是你可以删除在区块文件夹,但是如果你删除世界文件夹里面的区块文件夹。这仅仅是删除了地形,但是保存了玩家的位置信息和种子。注意!不要再服务器/游戏运行时这么做!
在你成功删除了区块文件夹之后,打开服务器/游戏来测试你的更改。你应该能看到含有一个大型生物群系的世界。
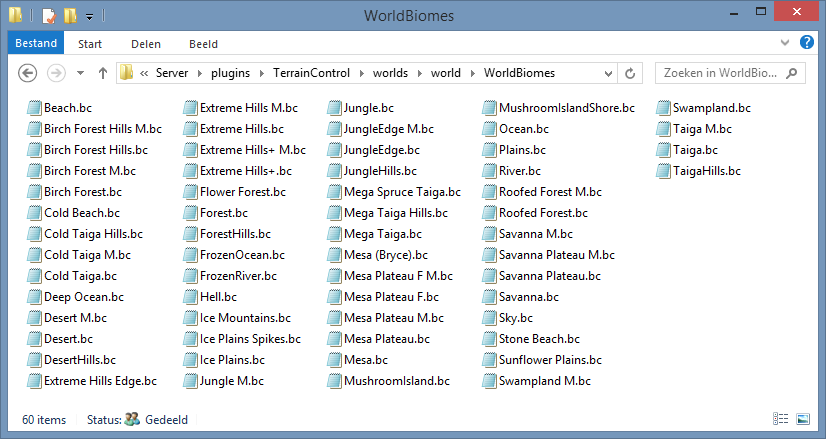
现在时候后来浏览一下WorldBiomes文件夹了。再次强调:不要忘记关掉服务器/游戏。你会发现一大堆代表生物群系配置(BiomesConfig)的 .bc 文件。有些文件看起来非常有规律 (啥是 Sky.bc?), 别的就根本不是生物群系 (从哪儿开始是沙滩生物群系? 河流呢?),还有一些是非常奇怪的名字 (梅萨高原 F M?). 这些名字都是又Mojang确定的。
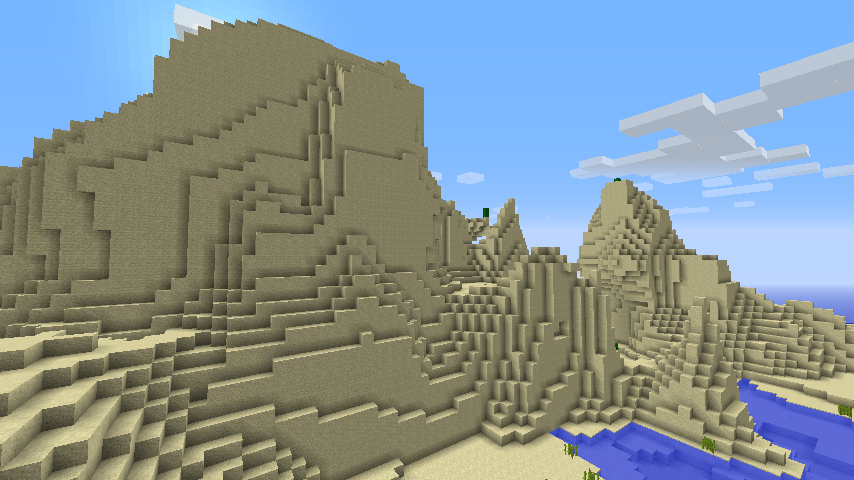
现在你可以忽略这些奇怪的生物群系名字。仅仅是打开 Desert.bc 文件。如果你往下翻这个文件,你可以发现BiomeHeight 和 BiomeVolatility(就是在Terrain Generator Variables下面的东西)。来让我们在沙漠上面加点山丘吧。 设置 BiomeHeight 为 0.2 (让地形更高一点,而不是多加点山丘) 还有 BiomeVolatility 设置为 0.4 (让这里多加点山丘). 现在保存一下,删除区块文件夹。如果你确定你使用的是12号种子,你可以使用/tp -19 80 -306来传送到一块沙漠里面。
也许悬崖边的石头惹恼了你,也许沙石看起来更棒。关闭游戏/服务器,打开 Desert.bc 然后设置 StoneBlock (在“Block”部分) 为 SANDSTONE. 这把所有的石头改成了沙石。关闭游戏/服务器,删除区块文件夹然后打开服务器/游戏。
现在也许你体验到了Terrain Control的一丁点力量。是时候教给你新东西了!如果你就是想知道其他的设置会产生什么效果,你可以好好看一下 WorldConfig 和 BiomeConfigs文件里面的设置. 如果你要创建你的自定义生物群系,你应该继续读下去直到向导结束。在主页面你还可以发现一大堆其他向导。样例页面也许很有用哟。
你的第一个自定义生物群系
在这个向导里面我们来创建我们的第一个自定义生物群系。在前面的教程中我们把默认的沙漠多加入了一些丘陵,把石头替换为沙石。我们现在将创建一个有很多花和一些树的山地。
你可以使用之前的世界继续工作。或者,您可以创建一个种子为12的新的世界。请确保GenerationDepth也设置为 12 (在 WorldConfig.ini 中找到)。这将使生物群落更大。如果你已经这么做了,你可以使用本教程中的坐标。如果不是,你会发现自己在一些其他生物群落中迷路了,你必须自己找很多的一些生物群系。
我们将通过向生物群系列表添加自定义的生物群系开始。我们要修改的第一个选项是 CustomBiomes。打开 WorldConfig.ini 文件,并搜索该选项。要编辑看起来像这行而且有CustomBiomes的一行:
CustomBiomes:Flowerfield:40
这样会使Terrain Control控制器读取叫做Flowerfield 的生物群系。生物群系的ID将设置为40。生物群系ID就像方块ID一样,但是这有专门的列表记录以及最高的生物群系ID只能是254,两个生物群系不能出现相同的ID。
如果你重启了你的游戏/服务器,你会在 BiomeConfigs 目录下发现一个新文件: FlowerfieldBiomeConfig.ini。然而,你的世界看起来没什么变化。我们需要将我们生物群落系添加到生物群系列表。NormalBiomes(在WorldConfig.ini里面)是个不错的选择,因为这使它生成为正常的生物群系,就和大多数生物群系一样。下面来把你的生物群系添加到NormalBiomes 列表:
NormalBiomes:Desert,Forest,Extreme Hills,Swampland,Plains,Taiga,Jungle,Flowerfield
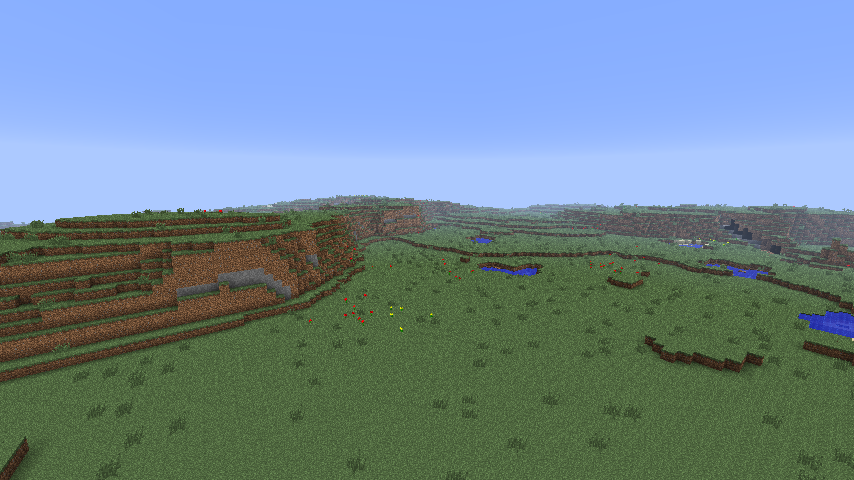
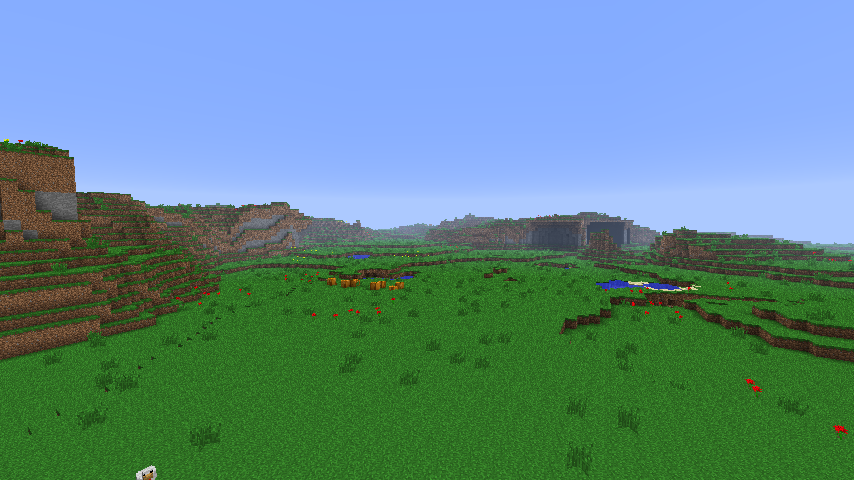
确保服务器关掉/游戏地图没有开启,删除世界文件夹区块文件夹然后重新打开服务器/地图。然后使用/tp -1010 78 -11来传送到这个位置,你可以看见你自定义的生物群系。不过它看起来还不是那么好,但别忘记,你还没有改变任何设置呢:
如果你没有使用单人游戏Mod: Terrain Control,颜色会出现一点点差别。
首先,我们来使劲绿化一下生物群系。打开 FlowerfieldBiomeConfig.ini。向下滚动直到你看见 Visuals 和 weather section(视觉效果&天气部分)。在这里你可以更改生物群系的颜色。但是,如果在客户端上没有Mod:TerrainControl,则不会有任何效果。如果你把地图应用在单人游戏上面,这当然一点问题也没有。但是如果你使用在Bukkit服务器上面,你的玩家只能看见Minecraft标准颜色模式。颜色为十六进制。你可以搜索一下“拾色器” 。请注意一下大多数拾色器使用的是带有前缀#的颜色编号,这在网页设计中是常见的。但是,TerrainControl要求使用0x来代替#,这是在Java中常见的。
在本教程中,我们并不打算启用颜色设置。TerrainControl有一个很酷的选项,可以使用别的生物群系的ID来保存我们自己的生物群许。这将会使颜色,天气和生物都和另外一个生物群系相类似。幸运的是,地形的形状和特性仍然看起来一样。我们打算使用蘑菇岛生物群系,因为它有很好看的绿色草地(通常不常见,因为那里覆盖满了菌丝,但试着在那里种一块草你就能发现了)。作为额外的奖励,没有地对生物生成在我们的花田上面。向上滚动查找 ReplaceToBiomeName 设置,并将其设置为 MushroomIsland。
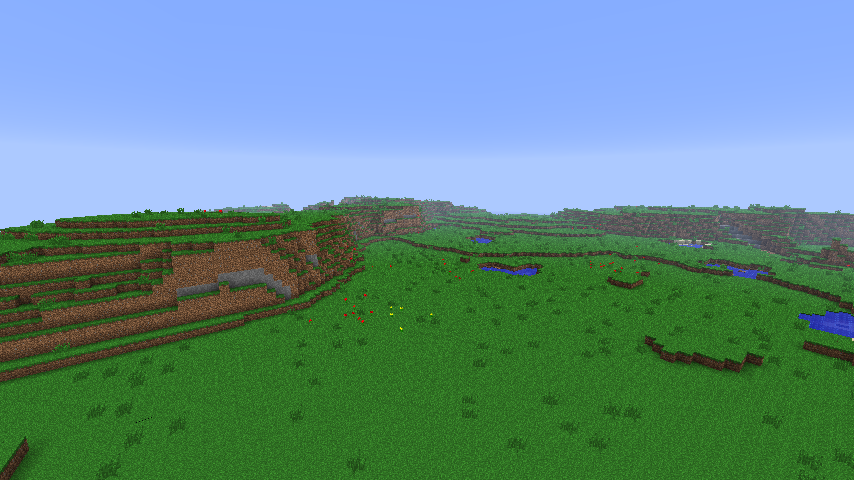
请确保服务器关掉/地图没有打开, 删除世界文件夹内的区块文件夹并重新启动服务器/打开地图。使用命令 /tp-1010 78-11 传送到该位置,您现在可以看到生物群落绿了很多:
现在,我们要让生物群落多一点山丘。再次打开 FlowerfieldBiomeConfig.ini,将 BiomeVolatility 设置为 0.5。如果你现在想要看一眼,你会看到,在一些地方土地低于海平面。我们不希望这样,因为要解决这个问题所以我们把生物群系的海拔提高一下,而不是让其多一些山丘。将 BiomeHeight 设置为 0.5,使生物群落高一点。
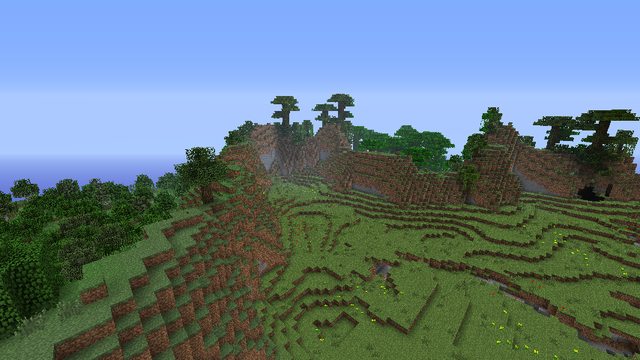
关闭服务器/世界, 删除区块文件夹并重新打开服务器/世界。现在,您应该看到一些小山:
译者注:今后所有TerrainControl插件统一译为本插件
现在我们要将一些资源添加到生物群系。本插件拥有强大的资源控制体系。它是由一长串的列表来控制。每个资源可以是矿、 一颗植物、 一棵树,小湖之类。几乎所有资源都有其生成频率选项,该数据选项设置其生成频率是默认的多少倍。几乎所有的资源也有稀有设置,来确定成功尝试生成的概率。通常的地形有另一个限制因素: 如果没有足够的空间来生成一棵树,它仍然不会生成,即使概率是100。
资源系统所使用的函数语法也用于其他地方的一些配置。他是这样使用的:
NameOfFunction(parameter,parameter,parameter,...) 函数名(参数,参数,参数,……..)
如果你有像 Microsoft Excel 电子表格使用的经验,这种语法应该熟悉。每个参数所做改变都会影响在资源中的东西。每个参数都会影响资源中的一些东西。
所有的资源同时摆放在一个列表中,叫做资源队列。但是这已经超出了本向导所能够介绍到的范围(查看这个页面),但是一些关于我们的植物生物群系的有趣的资源也许会被描述。
花在Minecraft中是单一的方块资源。在资源队列中, 有两个资源设计是为了单一方块。草的工作(即草在本插件的生成时做的运算)比植物更容易一些,但它只可以在地形的顶端生成。而植物在最小和最大高度之间选择一个随机值,然后看看这个位置是否是合适的。而草只是简单的把自己生成在最高的方块上面,关于这个你可以查看一下高度图。
出于某种原因Mojang在Minecraft游戏中使用植物的资源方式来生成花。我们没有理由也这样做,我们将使用草的资源生成方式。草的资源生成方式的语如下所示:
Grass(Block,BlockData,Frequency,Rarity,BlockSource[,BlockSource2,BlockSource3.....]) 草(方块,方块数据,生成频率,稀有度,方块源[,方块源2,方块源3.....])
Block是方块的ID或者方块的名字,BlockData是方块的数据从0到15。Frequency 和 Rarity在之前已经讲解过好几段了。BlockSource是可以在此方块上生成所指定的方块。
首先,我们删除掉两行关于标准的花的生成,我们并不打算使用植物资源生成方式。从资源队列中删除这两行:
Plant(RED_ROSE,2,100.0,0,128,GRASS,DIRT,SOIL) Plant(YELLOW_FLOWER,2,100.0,0,128,GRASS,DIRT,SOIL)
然后我们在资源队列的末尾添加如下的草地资源生成方式:
Grass(RED_ROSE,0,40,100,GRASS) Grass(YELLOW_FLOWER,0,80,100,GRASS)
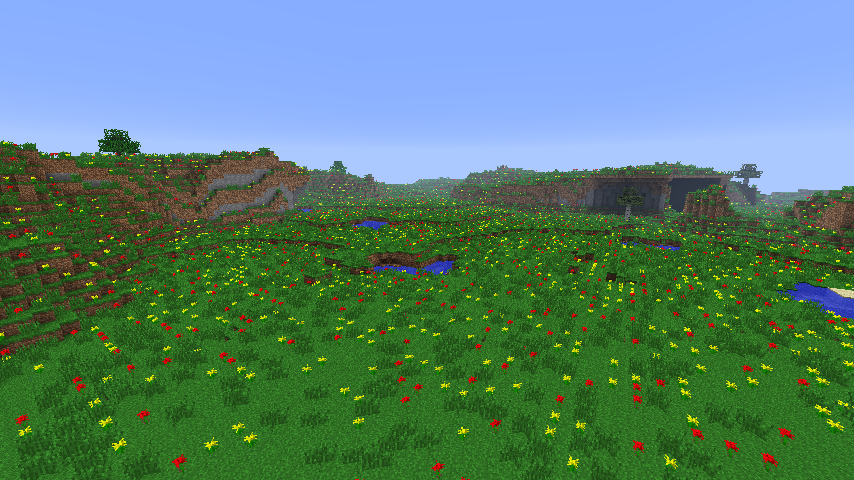
这应该会在每个区块上面多生成40个红玫瑰和80朵黄花。当然,地形并不总是总适合花的生成,所以我们不会看到那么多的花。另外一件事情是每次生成位置的选择是随机的,这意味着它可能替换一朵已经生成了的花!
像往常一样,如果你关掉了服务器/游戏,删除区块文件夹然后重新打开,你会看到这样的景象:
哇!好多好多花啊!让我们再添加一些高大的草来让我们的生物群系更好看一点怎么样哟?这儿已经有关于高大的草在资源队列里面了,所以我们只是更改一下资源生成的概率罢了。把这一行这么改一下:
Grass(LONG_GRASS,1,10,100.0,GRASS,DIRT) 找到这一行: (注意把10替换成80)
Grass(LONG_GRASS,1,80,100.0,GRASS,DIRT) 关掉服务器/游戏,删除区块文件夹然后重新打开游戏/服务器。看起来好多了,难道不是么?
本教程几乎已经结束了,但是我们还需要添加一些树。如果没有树,那么在这个生物群系中将很难生存下去。树资源的语法如下所示:
Tree(Frequency,TreeType,TreeType_Chance[,Additional_TreeType,Additional_TreeType_Chance.....]) Tree(生成概率,树的类型,树的类型的概率[,附加的树的类型,附加的树的类型的概率.....])
它有一个很俏皮的语法来生成你想要什么类型的树。每次尝试(有概率的尝试),它首先选择第一个TreeType。如果这个TreeType没有成功的生成,那是因为TreeType_Chance(这一一个控制成功生成的概率)或者因为地形不合适。然后它继续选择下一个 Additional_TreeType。如果那棵树还是不能生成,将会继续,直到列表中的所有树都被处理。
有些树的名字并不好记,比如说Forest其实是白桦木,而Tree却只是橡树。
把这一行加入到资源队列的末尾:
Tree(1,Forest,4,Tree,4) 这意味着每个区块中只有一次尝试。这种尝试,只有4%的概率(地形是合适的)能成功生成白桦树。如果白桦树没有成功的生成,只有4%的概率会生成一棵普通的橡树。
关掉服务器/游戏,删除区块文件夹然后重新打开服务器/游戏。我们的生物群系从技术上讲已经完成了:
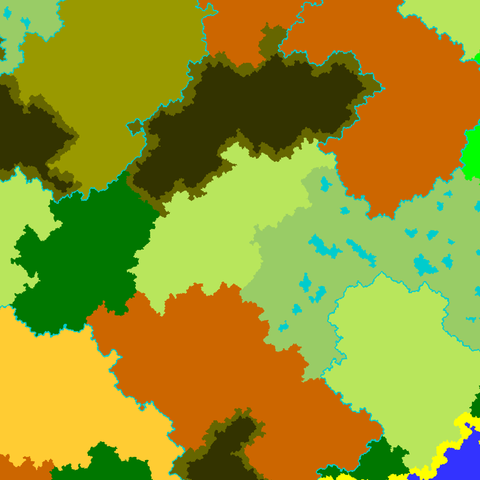
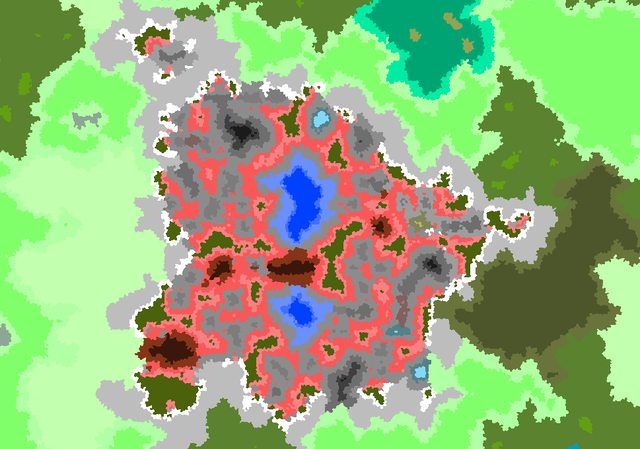
然而,如果你在Bukkit服务器上面而且使用了/tc map,生物群系就会显示为方块生物群系。你可以通过改变BiomeColor来改变这个事实。我们将会使用0xb8e65c。关掉服务器/游戏,删除区块文件夹然后重新打开服务器/游戏。执行命令/tc map,你会得到一张像这样的地图:
如果关于这个世界你有任何问题,你可以在这里下载已经完成的地图版本。
恭喜,你已经完成了你的自定义生物群系!现在你可以创建如你所愿的生物群系啦。你已经知道如何创建山丘、森林、草地、鲜花等等。下面是一些额外的贴士:
- BiomeTemperature:0 将会导致生物群系被雪覆盖。但是在客户端没有安装本Mod的,将会在地上看到雪,但却下着雨。解决这个问题你可以使用ReplaceToBiomeName:Taiga.
- 水将会在地形地狱海平面试产生。使用 BiomeVolatility 以及 BiomeHeight 设置你可以更好的控制陆地形状的生成。
- 看一下默认的配置文件来寻找如何让你的生物群系取得一定的效果。TC论坛帖子中的下载资源同样也是一份有价值的资源。
祝你好运!
常见问题
本插件并不一定总能把地形制作的如你所愿。此页面将把初学者经常遇见的一些问题罗列出来。如果你仍然困惑,你可以创建一个论坛话题 来描述你的问题。问题应当描述的尽可能详细,并且把你的日志也发送出来(最好是 pastebin.com 上的这种或者类似的) 或者把你的日志放进ZIP压缩文件当中。
- 我的world文件夹没有被创建,只有GlobalObjects 存在。
本插件不会在你安装时接管你的世界。你需要为一个世界打开本插件。同安装说明一模一样的来安装。如果你仍然困惑,发布一个论坛话题并且把启动日志加上是很重要的。
- 我的设置没有对地形产生任何影响。
你试过再生地形(即删除区块文件夹)么?如果是,把你的TerrainControl文件夹放到另外一个地方并且重新打开服务器/游戏然后看看本插件是否已经重新生成了配置文件。如果没有,那么本插件甚至没有读取它们。参阅上述有关问题来寻找这个插件的解决方案。如果是,请看看BiomeMode 和 TerrainMode ,确保它们没有设置为默认(Default)(这使得本插件忽略你的配置来使用香草来代替)。
- 我出生在一片海洋中而没有任何陆地。
别担心,陆地存在。不停地游泳。或者你可以改变地图的种子(服务器: 你需要新的 level.dat,仅仅改变 server.properies 是不行的)。11号种子将会把你生成在陆地上面。 你也可以禁止或海洋面积(改变WorldConfig中LandRarity 设置):
- 特定的设置并不起作用(但是其他的设置正常工作)。
大多数设置区分大小写和空格的,这是为了使它更加准确。某些设置需要较高的数值来使其具有明显效果。有些设置需要在客户端上面有对应的Mod(见文件/此wiki中的注释)。有些设置并不依赖于其他的设置(同上,见文件/此wiki中的注)。
如果你不熟悉本插件,始终确保SettingsMode 设置为 WriteAll。这会使地形控制重置或删除它一概不听(译者:并不清楚作者到底要表达什么),所以,你会立刻注意到有些不对劲。
中期讲解
如何从一张图片创建世界
如果你不能找到你所需要的信息,你可以参考论坛或使用mysource所作的这个教程
创造属于你自己的世界是很困难的,河流,岛屿,也许总是会在错误的地方产生,这应该不是你想要的。也许你的山看起来不够好,当然,你也可以拥有更多生物群系的选项。但是,运用地形控制的功能,从一个图像生成生物群系。你可以完全操控你的世界,或者使用原有生态环境并改变地形来创建一个图片。
优点与缺点
优点:
- 完全控制你的生物群落
- 使其更容易处理
- 可以用来定制冒险的地图
缺点:
- 图片并不是无限大的,你必须让生物群系控制器生成别的生物群系当你在图片所表示的范围之外时。
- 没有随机生物群系组合:生物群系布局看起来一样好(或坏),正如你所画的。
- 有一些怪异的东西,将在下面说明。
创建一个图像
在每一个BiomeConfigs 有一个BiomeColor变量. 这个变量应该是生物群系的十六进制颜色。它不仅用作 /tc map 命令输出颜色,而且作为输入图像的颜色。必须使用准确的设置“BiomeColor”,让图片所生成的生物群系更准确。两个生物群系不一定是同样的颜色, 如果是一样的颜色将出现奇怪的问题。每一个自定义生物群系你都应该把 BiomeColor 从 0x000000 (黑色) 到另一种颜色。
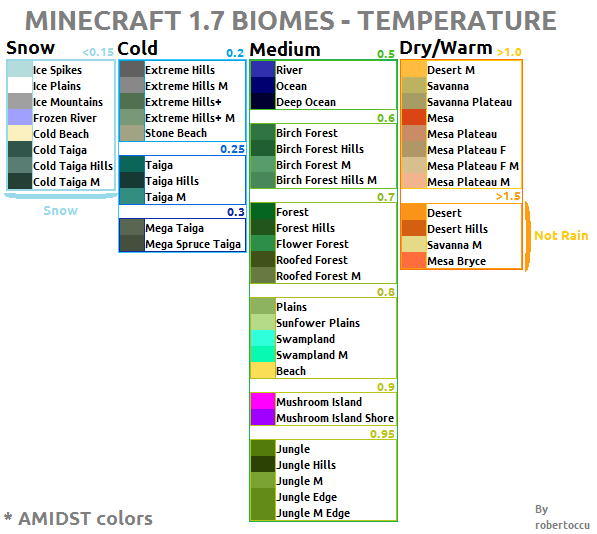
默认生物群系的RGB(红绿蓝)数值和16(0xXXXXXX)进制数值 (本插件使用和 AMIDST一样的生物群系颜色):
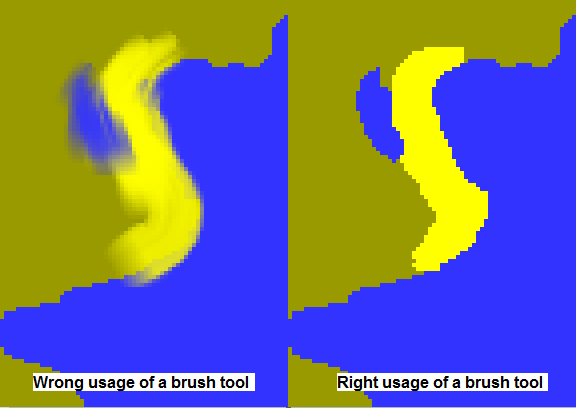
图片上面的每一个像素代表一个4x4的方块。正如上文所讲,图片中的颜色必须同 BiomeColor 一样。大多数图片编辑器的笔刷工具不管用,因为它们把颜色改成了另外一个。
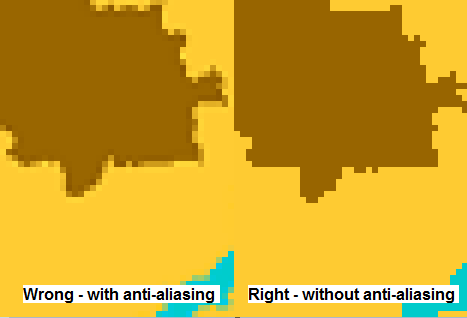
模糊工具(称为抗锯齿)允许对象正确的混合图像但是,本插件并不能正确的识别这些颜色。当本插件发现一种颜色没有在配置文件里面提到时,将会在那里生成海洋。所以还是使用编辑(俗称)铅笔工具更好一点,因为这个并没有使用到抗锯齿。一定要把文件保存为png格式,因为本插件只支持这一种格式,其他的大多数格式会在压缩(保存)时改变颜色。在使用图片生成世界时一定要确保它没有使用抗锯齿或者被压缩。
另外一种常见错误是在调整图片大时没有禁用抗锯齿:
当使用草图开始绘画时,可以假定右侧为北方,也可以使用上侧为北方(这是最常用的),在生成时请将图像旋转90度。如果要编辑使用“/tc map”命令得到的地图,请参见下方章节。
让本插件更正确的生成地形
当你满意你的结果之后(确保大小和角度都调整正确),是时候让本插件来生成啦。把图像放到WorldConfig.ini旁边然后看一下以下设置:
ImageMode-可以设置为 ContinueNormal 或 FillEmpty 。 'ContinueNormal' 会告诉地形控制生成随机地形(如 BiomeMode:Normal ,基于它的设置) 在图像所表示的范围之外。 FillEmpty 将填补图像外区域与 ImageFillBiome 设置相同,默认海洋生物群落。
ImageFile - 你要使用的图片的名字,默认为map.png,必须是png格式。
ImageFillBiome - 生物群落设置'ImageMode' 设置为 FillEmpty 时用于生成图像表示区域之外的地形生成(注意: 在TerrainControl找到一个无法辨识或起冲突的生物群系颜色时,如果这个更改了使用的生物群系,则需要进行测试)
ImageXOffset 以及 ImageYOffset - 改变图片的坐标位置,常用来改变x:0 y:0坐标相对应的图片位置。使用 ContinueNormal 来把图片大小减半的时候, 使用FillEmpty 模式把减半的图像大小改为相反的数值。样例: 一个 500x500 大小 map.png文件在ContinueNormal模式下,X和Y坐标设置为250, 但是FillEmpty模式为 -250 。
使用/tc map和ContinueNormal来编辑一副随机地图
本插件使用命令/tc map来到处一副生物群系地图。它所生成的图像有一些额外的功能,可以重新作用为输入图像的 FromImage 。
当时也/tc map时,本插件将会把图片的右边设置为地图的北边,所以如果你假定顶端为北边,请旋转90度。/tc map命令到处的是1像素相当于1方块但是导入时为1像素等于4x4方块。当图片是你地图的尺寸时你应当把它缩小四分之一来使世界的大小正常。
基本的自定义世界
在自定义之前,岛屿生物群系以及边界生物群系仍然要讲一讲。 这个教程将会帮助你定义世界的形状。本教程仅仅描述了 BiomeMode:Normal 模式。此教程可以使用于单人游戏以及多人游戏模式,拥有也许没有 用户界面. 你应该已经安装本插件,你也应该知道如何更改设置以及如何重新生成世界。如果并没有,请看这里 来寻求安装帮助以及 这里 来查看准备工作教程。
再一次打开一个新的世界。首先,查看WorldConfig.ini 文件然后看看在'Biome Generator Variables'下面的设置 (用户界面: World tab -> Biomes tab). 往下滚动一点,你将会看见四个变量:
NormalBiomes , IceBiomes , IsleBiomes and BorderBiomes .
理解他们需要了解一些背景信息。游戏中的世界是由各大洲为原型的。在'NormalBiomes ' 生成。其余部分则由海洋生物群落区填补。使这更有趣的你可以给生物群落知道边界 (例如,海滩生物群落区是海洋和大多数其他生物群落之间的边界) ,要使用 'BorderBiomes(译为边界生物群系) '。此外可以生成其他生物群落内部的生物群落。他们被称为 ' IsleBiomes (译为岛屿生物群系)'。例如,蘑菇岛是岛内海洋生物群落内部的生物群落。一些地区在地图标记为 'frozen(冻土)'。如果冻土区在大陆的上面将会生成一个 'IceBiomes(冰雪生物群系) ' (而不是一个 'NormalBiomes')。如果它出现在海洋上面将会生成一个 FrozenOcean (上冻的海洋)(然而你可以关掉) 生物群落。
Technical biomes(表面生物群系)
也有一些'technical biomes(表面生物群系)'。他们不被视为真正的生物群落区,但他们让地形更加多样化。本节描述其功能的默认设置,并可能激发您原创的灵魂。请记住你可以改变一切: 如果你想要的你甚至可以生成 TaigaHills 生物群落作为丛林和沙漠之间的边界。
河是表明生物群系之一: 它被称为一条河,但它是只是一个生物群落含有大量的水。世界控制器将会在大陆顶端生成该生物群落(形似一条河),并且当冻土区出现在一条河上面的时候,FrozenRiver(上冻的河流) 生物群落区将会代替它(但是您可以关掉)。您可以编辑 RiverBiomeConfig 里面生成的东西使它生成的根本不像一条河:
也有一些山生物群落: TaigaHills、 JungleHills、 DesertHills 和 ForestHills。那些将作为 IsleBiome(岛屿生物群系) 和他们生成在针叶林、 丛林、 沙漠和森林之间。当你看到一座大山在这些生物群落之一的里面的时候,可以确保你看到了 HillsBiome。(因为Extreme Hills(极高的山)添加到 'NormalBiomes'并不会产生在其他生物群落内)。河,也就是含有很多水的生物群落,同时也作为了 IsleBiome的一员: 它生成为沼泽里面的小岛。
作为 BorderBiome的 MushroomIsland 与其他所有生物群落 (通常是海洋) 来平滑地过渡,生成 MushroomIslandShore ,极端高的山 (也是 BorderBiome) 为平滑过渡极端高的山和大多数其他生物群落。
大多数使用本插件的人经常使用表面生物群系来把它们的生物群系做成它们想要的,他们使用它来平滑的过渡两个生物群系,这使得生物群系更加多样化,比如说生成雪山等等。例如, Burckhart(布什) 使用了 一大堆边界生物群系和岛屿生物群系来生成一条山脉。
NormalBiomes(标准生物群系)
说明:文中的香草生物群系指的是已经存在的生物群系,换句话说就是纯净Minecraft中所有的生物群系。
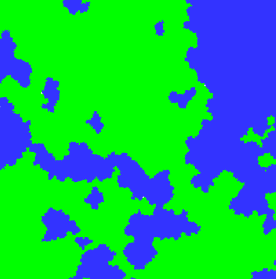
在这里你可以看到地图上只有陆地和海洋。
绿色区域是 NormalBiomes (标准生物群系),蓝色区域是海洋生物群落区。
你可以使用 LandRarity 变量来设置海洋和陆地之间的比例:
现在是时候来看看如何填充那绿色的土地。我们在设置 LandRarity为100。如果你看看了NormalBiomes 变量,你将看到以下内容:
NormalBiomes:Desert,Forest,Extreme Hills,Swampland,Plains,Taiga,Jungle
NormalBiomes:沙漠,森林,高山,沼泽,平原,针叶林,丛林
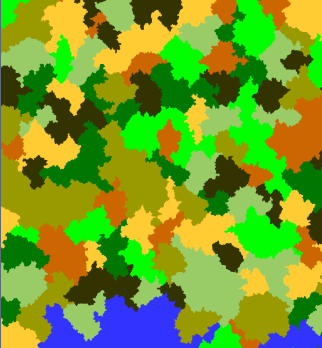
其中给出了以下生物群落区地图 (IsleBiomes 和 IceBiomes生物群系被移除了,这使图像看起来更干净):
如果你想要一个单调(热)的世界,你可以把 NormalBiomes 中的大多数生物群落移除:
NormalBiomes:Desert,Jungle
NormalBiomes:沙漠,丛林
(如果你仍然看到有一些寒冷地区在游戏里面,是因为 IceBiomes的存在。我们一会再管他。)
你可以更改生物群系稀有度在 BiomeConfigs里面。如果你想要在你的世界有更少的丛林,去 JungleBiomeConfig.ini 找到BiomeRarity (这是实际上生物群落生成的概率) 设置为 25。
现在我们在讨论 NormalBiomes。稍后我们将制作我们自己自定义的生物群落。
IsleBiomes(岛屿生物群系)
TODO: 我们是在这里只是玩弄一些岛屿生物群落
岛屿生物群落是可以生成在其他生物群落之内的生物群落。生物群落需要较小的面积 (所以 BiomeSize 需要更高)才能够在另一生物群落区之内生成。
当生物群落为岛屿生物群落时, BiomeRarity 变量会略有不同。它现在非常敏感: BiomeRarity:100 将使它生成在生物群落区之内的各个位置 (除了在边界(两生物群系区之间位置)-填补这一区域应使用边界生物群落)。 BiomeRarity:99 将使它生成约 50%的区域,25%的区域为 BiomeRarity:98,等等。
Mister_Tesseract 做了有关岛屿生物群落的详细的教程。在这里阅读它。
BorderBiomes(边界生物群系)
TODO 译者注:这是作者还没有完成,不是译者没有翻译
IceBiomes(冰雪生物群系)
一些地区在地图标记为 'frozen(冻土)'。如果冻土区在大陆的上面将会生成一个 'IceBiomes(冰雪生物群系) ' (而不是一个 'NormalBiomes') (然而你可以关掉:通过设置(WorldConfig) 中的 FrozenRivers 为 false)。如果它出现在海洋上面将会生成一个 FrozenOcean (上冻的海洋)生物群落(然而你可以关掉:通过设置(WorldConfig) 中的 FrozenOcean 为 false)。
您可以通过更改 IceRarity 变量更改冻土区域生成的概率。较低的值将生成比较少冻结的区域,较高的值会使地图的绝大部分冻结。
请注意生物群落区的温度并不是取决于将它添加到 IceBiomes 列表,而是更改在 BiomeConfigs 中的 BiomeTemperature 变量。你可以在 NormalBiomes 列表中获取到冰冻的生物群系 (针叶林是在默认配置中的例子),你可以在 IceBiomes 列表中有炎热的生物群落。这使名称 IceBiomes 出现了小小的误差。
CustomBiomes(自定义生物群系)
默认情况下只有香草生物群落在 BiomeConfigs 文件夹中。若要添加您自己生物群落区,您必须先将其添加到 CustomBiomes 列表。这将使本插件生成它的配置文件 (或如果它已经存在,请使用该文件)。然而,它不会控制它们产生在你的世界。就像香草生物群落,你必须将它添加到四个生物群系中的一个或多个物群落区列表。所以您自定义的生物群落是总是在WorldConfig.ini 出现在至少两个地方。
(但是,您还可以让你的生物群系从一幅图像中生成,你只是将其添加到 CustomBiomes 列表以及图像所对应的生物群落区。欲获取更多信息,请查看 [1])。
在每个列表中的条目之后,您将看到":"与它的数量 (如果您自己没有添加它,本插件将替你添加它):
CustomBiomes:MyBiome:50,MyOtherBiome:51
这是保存在世界中的生物群落区 id。这个永远不会改变除非你重置了世界!(想象假如你自定义的丛林生物群落与 id 50,现在使用 id 50 是雪生物群落。这会导致所有自定义的丛林被冰冻!)此外,永远不要使用一个已在香草生物群系使用的 id。目前香草生物群系使用 id 0-22,但随着新的生物群落区添加到香草生物群系,将按照顺序使用新的生物群落区 id。所以如果您使用的生物群落区 id 为40 ,你应该可以保留它很长时间。
基本的自定义生物群系
此页重点介绍创建和编辑生物群落的基础知识,包括更改地面和水、 矿石、 树/植物的生成以及山/坑的生成。ReplacedBlocks 特性的信息,请使用 CustomHeightControl 等更难一些的功能,比如说瀑布(建设中)。
生物群落区的编辑和设置可以分成四个主要部分: 生物群落区位置、 地形形状、 生物群落区的实体数量和外观。有关更多生物群落的生成位置信息请参阅 本教程。
地形形状
地形的形状被一大堆变量所控制。你可以改变它的高度,有多不平坦(即丘陵),多少空气要被填充为水。地形的形状是计算地形之后,地形控制器所要过的第一道关口。
地形高度
其中确定生物群落高度的第一个和最重要的变量是 BiomeHeight 。这个变量依赖在 worldconfig 中的WorldHeightBits 设置。Minecraft 将它生成的地形高度划分为相等的正负值与以及BiomeHeight设置为 0.0 代表中间。在默认设置 (WorldHeightBits:7) 的地形将生成达 128 的高度,将把 BiomeHeight:0.0 放在 y = 64的位置。如果 WorldHeightBits 更改为 8 ,高度就会成为 256,然后每个关于高度的设置,其效果大致增加一倍。BiomeHeight:0.0 将会成为 y = 128的位置,加大到 0.1 将双倍地对 WorldHeightBits:7 产生影响。把WorldHeightBits提高为8,会使得地形生成最多 256的高度。如果将WorldHeightBits 降低,将会产生相反的效果,每一次降低会使地形生成最大高度减半。WorldHeightBits 为6也不能使地形高64左右。提示:这两个变量不会有效果如果控制器被设置为OldGenerator(此设置在WorldConfig里面)。
改变 ExtraBiomeHeight 将会以“8乘以它的值”的次数来创建悬崖。改变 ExtraHeightConstrictWaist 可以确定悬崖的生成。保持它的数值在-0.4和1.0之间。大于 1.0 可以导致悬挂和漂浮的地形。负值会导致中部地区 (4 x ExtraBiomeHeight) 扩大。降低到 -0.4 以下可以创建地下的巨大洞穴。
下表可以帮助确定基于WorldHeightBits 为 7 和 8的高度设置。不要使用-2.0 作为 BiomeHeight 的设置,因为这是BUG。此外请注意地形不会生成最大的256 高度,它将停止在 255,如果在此之前没有别的方块。 BiomeHeight 可能会是-10 到 10 之间的任意值,虽然低于/高于-4/4 的任何值没有任何其他的效果了。
| BiomeHeight | WorldHeightBits:7 | WorldHeightBits:8 |
|---|---|---|
| -4 | 0 | 0 |
| -3.5 | 7 | 10 |
| -3 | 16 | 28 |
| -2.5 | 24 | 45 |
| -2 | Error | Error |
| -1.99 | 32 | 60 |
| -1.5 | 40 | 78 |
| -1 | 48 | 95 |
| -0.5 | 57 | 111 |
| 0 | 67 | 128 |
| 0.5 | 76 | 144 |
| 1 | 85 | 156 |
| 1.5 | 94 | 173 |
| 2 | 102 | 190 |
| 2.5 | 111 | 207 |
| 3 | 119 | 223 |
| 3.5 | 128 | 240 |
| 4 | 128 | 255 |
地形波动率
有很多的设置来调整有多少丘陵(换句话说,就是多么的不平坦)。其中最重要的是 BiomeVolatility。它增加将使地形成为一个多山的地形。0.0 使地形几乎变成超平坦。1.0 会给你小山。2.0 出现了悬崖。就像 BiomeHeight 一样,如果 WorldHeightBits设置为8,它的效果将会翻一番。此设置不能在 TerrainMode:OldGenerator模式下启用。
生物群系的实体数量
During the second pass of terrain generation the biomes are populated with resources like ores, trees, custom objects, flowers, tall grasses and small ponds above/below sea level. After this is done, biomes with a low BiomeTemperature will be covered in snow.
You can find all resources in the Resources queue.
外观
There are things that haven't got anything to do with terrain generation, but that you still want to change. For exampe, uou can edit the colors and weather of the biome. Sadly, the vanilla singleplayer client will ignore all those settings. It will also display custom (non-vanilla) biomes with the colors and weather of the plains biome. Players will need to install the Forge version of Terrain Control to fix this.
These settings, along with a description, can be found here.
Advanced
A TerrainControl Analysis
Slice It Up
A TerrainControl Analysis by Mister_Tesseract, modified by the community.
This page has been copied from here over to the wiki. Discuss this article in this forum thread.
Table of contents
- Introduction
- The chosen “default” values for the variables
- Generation Process
- IceSize and Ice Biomes
- Border and Isle Biomes
- BiomeRarity
- BiomeColor
- RiverBiome
- BiomeTemperature and BiomeWetness
- ReplaceToBiomeName
- BiomeHeight
- FractureHorizontal and FractureVertical
- BiomeVolatility
- MaxAverageHeight and MaxAverageDepth
- Volatility1 and Volatility2
- CustomHeightControl
- SurfaceBlock and GroundBlock
- UseWorldWaterLevel
- ReplacedBlocks
- Biome visual settings
- Credits
Introduction
Hello and thank you for your interest in this research about TerrainControl. I, Mister_Tesseract, call it a “research” and not a “tutorial” because it is more than a tutorial in that it tries to understand how the plugin works beyond what you really need to make it work in a general purpose. It is also less than a tutorial because it doesn’t provide many how-to’s (but perhaps I will do that a little more in the future). My ambition with this research is that after reading this once it is complete, you should be able to understand the deep mechanics that rule the TerrainControl generator enough to make virtually every possible biome in Minecraft.
Why not a simple step-by-step tutorial? I see two main reasons for this.
The first one is that TerrainControl is such a complex and vaste plugin that you cannot learn much from a step-by-step tutorial that would teach you how to make just one biome and then leave you on your own. There are so many parameters in TerrainControl that a tutorial would need to guide you through the creation of at least ten different biomes in order to have you get a glimpse of what it can do.
The second reason, a more personal one, is that it’s not my style to make that kind of tutorial. I have studied physics (and epistemology a little) and all that science gives you a methodology you cannot get out of your head just like that (and it’s so cool). So I set up an experimental protocol, I take measurements, I estimate margins of error, and I try to find applications for the newly acquired knowledge, which is pretty much what researchers do. This method cannot lead to a how-to tutorial without loss of information. But in the future I’m probably going to try and make a “generic” how-to which will explain in what order it is best to build a biome.
Obviously, I could look inside the source code and find the exact laws that rule the TerrainControl plugin and the Minecraft generator (or maybe I’ll find nothing at all) but believe me or not, I do this as if it was part of the game ; and I actually find it interesting and funny. In other words, I’m like a Minecraft crazy scientist trying to find the laws of the creation the universe.
Sometimes I might not be very clear in my explanations, and I apologize in advance for anything you couldn’t understand and that is due to my lack of clarity. Such clarity is one of my objectives but my priority was to finish a first version in order to release it as soon as possible. Hopefully that clarity will soon stop being a problem thanks to your feedback.
I try to use generated map images (with the command /tc map) as much as possible but sometimes I had to make more precise measurements, or it just didn’t help to have a map image (for instance when the image doesn’t show altitude). Here is the method I followed when a map image was not enough to fulfill the requirements in precision: 1.Create a world config with only one Biome in addition to Ocean and use it in a new world. 2.Delete the region folder if there is one. 3.Start the game in that world and make measurements about height, slope and shape of the terrain, and vegetation and ores. 4.Change a setting in the Biome config and save. 5.Quit the game. 6.Repeat from 2. until having enough measurements to have an accurate enough idea of the curve’s behaviour.
What I am looking for in this research is pertinence in terms of utility and not necessarily finding the exact inflection point of a function. For example, sometimes I will indicate what happens if you set a value inferior to -0.25 for MaxAverageHeight , but if you go at -0.20 it won't change very much so I could have put -0.20 to be more precise in my work. But the value -0.25 is safe and precise enough to be used as a zero and the lost information is a low cost compared to the time it would take to find the limit with better precision. This is what I mean by ‘utility’.
This partially explains the absence of regular intervals in the tables. You will also find odd values like 3.62 followed by 4.0 which seem close enough but I kept the measurement made at 3.62 because it gives a better idea of how strong you have to go down from 256.
There is also the default irregularity in terrain when all values are zero or close to their minimal effect. This doesn’t allow a perfect output in layer numbers because the terrain is not perfectly flat, even in the flattest areas (with most settings). I decided to choose the layer of floor that seemed to be the most represented in my environment after looking around a little, which was closest to the idea of an average/median value.
This study is evaluating every separate variable all other things being equal. If you have different results it is probably because you changed two variables at once. Some combinations of several variable changes will give expected results and some won’t. It is already a huge work to study each variable separately ; I probably won’t step into the details of studying every couple or triplet because it would take a very long time.
A very important point about all this research is that I write things here as I discover them. The facts (measurements) are obviously real and you will be able to reproduce them at will; but my interpretation is relative and it is always possible that a new fact comes burn my paradigm down to ashes. It happened to me when I came to Border and Isle biomes, as their size couldn’t match my interpretation. I then had to start from square one with world generation.
Conclusion: take every interpretation I make about this with a grain of salt. This is science, and as Karl Popper established it, if it’s science, then it can be tested. Even the most certain knowledge can be rammed down by the tiniest new fact. That is why I encourage you to comment and tell me when I’m wrong so the interpretation can be rebuilt and our knowledge in TerrainControl can see progress.
The chosen “default” values for the variables
The values and effects provided here were determined with using this WorldConfig.ini with a flat, resourceless PlainsBiomeConfig.ini biome. There are a few differences with default/vanilla settings:
- WorldHeightBits = 8 (max land height = 28 = 256) so regular land will be at layer 128 (instead of 64 for vanilla Minecraft). The default value for this is usually 7, which prevents land from appearing above layer 128.
- Almost every biome value is 0.0. The values that differ from zero are VolatilityWeight1 and VolatilityWeight2 because their default values are repectively 0.5 and 0.45. Sometimes BiomeVolatility is 0.1 instead of 0.0 because it looks like other variables are multiplied by BiomeVolatility and 0.0 would nullify them.
- No resources at all, for faster generation: it’s a lot of work for the computer to generate a new map at every game, and finding ores is of course not the objective. This is true for doing research like mine, but it is also true when it comes to creating custom biomes. There will be a point where you’ll be reloading a new map every 60 seconds and change the value by 0.05 in order to get the fine tune. Then you want to go as fast as possible and resource generation takes a lot of processing time. That is why ore, trees and mob distribution is the thing you want to create in last position in your biome, especially with a slow computer. Of course, when it will come to researching about ore generation, it will be included as well.
Generation Process
This part is about how I view how terrain generation works. I have acquired a good comprehension of it after reading this thread on the forums of dev.bukkit.org and I have developed my own way to formulating it but it’s basically the same explanation.
I wanted to explain separately WorldConfig.ini and xBiomeConfig.ini but it’s not possible to do without gaps or redundancy so I’m going to explain both of them as a whole. You will just have to figure out yourself where each variable stands.
One thing that I want to point at is that you can use any seed for TerrainControl. I noticed on the bukkit forums that some people kept using the seed “tim1998+steps1956” (which is not more special than any other seed). It is not mandatory at all. Every seed will work with TerrainControl, just like every seed works in the vanilla game.
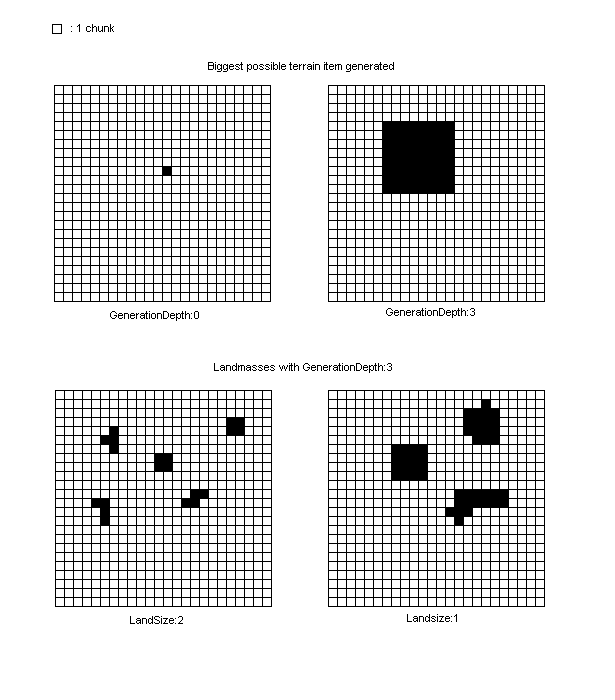
The smallest unit of size that the generator can create is 1 chunk. By default, GenerationDepth has a value which is around 10. Every new increase of 1 for GenerationDepth is a double in size for the largest thing the generator will be able to generate. The biggest possible size for a generated surface will then be 2GenerationDepth.
Important note: the following description is not true for biomes set as Border or Isle, only for normal Biomes. Borders and Isles will be explained right after.
At first, the world is a full Ocean. Once GenerationDepth is determined, the generator will add land areas (not biomes yet, only landmass) on that Ocean. This depends on three parameters: LandSize , LandRarity and LandFuzzy .
LandRarity has “useful” values from 90 to 99 (100 if you want very little or no Ocean). It’s not a linear function, so below 94 it’s very difficult to find any land.
LandSize will determine size of landmasses, and then the generator will add ice areas with IceSize the same way.
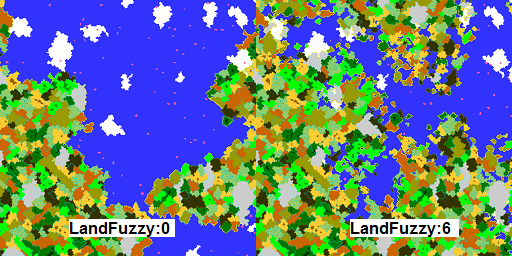
LandFuzzy adds irregularities to the landmass borders (maybe biome borders ?). Its value has to be between 0 and GenerationDepth - LandSize because those irregularities use the accuracy of the generator. with value 0 there won’t be any fuzzy added to the land borders, and maximum LandFuzzy values will add lots of irregularities which size will vary from half of the landsize (LandSize - 1) to 1 chunk.
After that, the generator will fill in the biomes, from the largest (small BiomeSize value) to the tiniest (large BiomeSize value).
I’ve determined that the biggest sized item the generator can create will be roughly 2GenerationDepth times bigger than 1 chunk.
Demonstration: 1. Open a reset world. 2. Go to coordinates 0,0 and look towards east. 3. Go forward until you step on a new biome, then stop. 4. Note your coordinates which are at the limit between biomes (x or z should be 0). 5. Increase GenerationDepth by 1. Reset the world and open it again. 6. Repeat steps 2 to 5 as many times as desired.
These are the results I got :
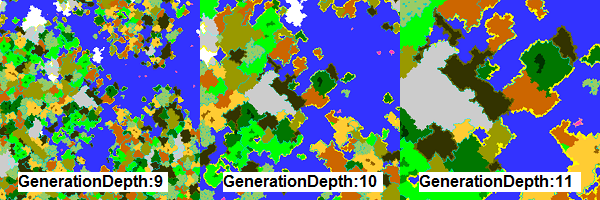
| GenerationDepth | Distance |
|---|---|
| 9 | 34 |
| 10 | 67 |
| 11 | 136 |
| 12 | 269 |
If you look well you may notice that the distance doubles when increasing GenerationDepth by 1. In every direction it’s the same pattern.
The following table is a direct consequence of that. With a biome taken from the first line, you can find biomes smaller than half a chunk because of other settings. I made it with a special biome with a very high BiomeHeight. It made it easier to spot while researching for GenerationDepth and other size variables.
Note that the same table can be used for BiomeSize and IceSize instead of LandSize .
Because the values in this table are theoretical, the size of biomes, land and iceland will differ from the values indicated here but a biome A with 1 more in BiomeSize than a biome B will always have approximately 4 times the surface of biome B. I have still to determine an acceptable margin of error for this ; until then it should be accepted as a good enough approximation that two biomes with the same size class have a surface ratio inferior to 4, and two biomes with 1 in size class difference should have a surface ratio between 2 and 8.
| LandSize | GD - LandSize | Land size in chunks | Land size in blocks |
|---|---|---|---|
| GD | 0 | 1 | 16x16 = 256 |
| GD-1 | 1 | 4 (not 2 because it’s a surface and 2*2=4) | 32x32 = 1.024 |
| GD-2 | 2 | 16 | 64x64 = 4.096 |
| GD-3 | 3 | 64 | 128x128 = 16.384 |
| GD-4 | 4 | 256 | 256x256 = 65.536 |
| GD-5 | 5 | 1024 | 512x512 = 260.000 |
| GD-6 | 6 | 4096 | 1024x1024 = 1.000.000 |
| ... | ... | ... | ... |
| 1 | GD-1 | 4GD-1 | 2GD-1x2GD-1 |
| 0 | GD | 4GD | 2GDx2GD |
Recap :
- GenerationDepth : Largest possible size for an item.
- GenerationDepth - Landsize : The bigger it is, the bigger the land size.
- GenerationDepth - Icesize : The bigger it is, the bigger the ice size.
- GenerationDepth - BiomeSize : The bigger it is, the bigger the biome size (not true for Isle Biomes).
- A decrease of 1 in size class means a double size in blocks.
IceSize and Ice Biomes
IceSize is another type of landmass that will be filled only with the biomes listed in IceBiomes . It doesn’t force you to put snow biomes in there; nor will it make the biomes you put in the list snowy. It can be a handful workaround if you want two classes of biomes that don’t get mixed together. If I’m right, you could for instance have normal biomes and use IceBiomes to put a whole bunch of Nether-style biomes that will stick together in a large common area. This has to be investigated further, of course.
Border and Isle Biomes
If you trust the previous chapter to add Border and Isle Biomes you will encounter several issues. On the bukkit dev forums, thedeadlytao had noticed there was a problem. This is an explanation for it.
A biome that is set as a border appears only in specific biomes, as indicated in the biome config file ( BiomeIsBorder ). When the generator reaches the size class of that border (reminder: the generator draws the biomes from the largest size class first, then goes more and more little until the smallest ones have been drawn), it proceeds to draw it within the boundaries of the biome of which it is the border, from the outside towards the center. The border size determines the distance from the edge to the center.
Please have a look here: http://i.imgur.com/inpf4.png. This picture summarizes pretty well how the border is painted in another biome. This also explains why the border size should not be too close to the inner biome size, else the inner biome will disappear completely. The Border BiomeSize should be between GenerationDepth and the inner biome’s BiomeSize value + 1. If you set the maximum possible value ( GenerationDepth ) the Border will be approximately one chunk width.
I tried several settings for BiomeRarity on the border, but nothing happened. For now we’ll assume that BiomeRarity has absolutely no effect on borders but I’ll explore this more in depth later if possible.
Something rather important to note is that the border makes the inner biome smaller, so you might want to make the biome bigger before putting a border in it.
Isle Biome: http://i.imgur.com/3DG10.png. Have first a look at the bottom of the picture (rarity 100). (please don’t pay attention to the blue biomes in this picture, they change because I was running several experiments at once but the relevant information here is given by the same colors as in the previous image, i.e. those colors:![]() )
)
Isle Biomes work pretty much the same way as Border Biomes. The generator tries to find the outer limits of the isle biome by going from the edge of the outer biome towards its center. Then it paints the isle biome inside of the limit (instead of outside like it does for Border Biomes). There is an example showing it approximately with distance arrows at the bottom of the picture. All this leads to the fact that unlike other biomes, Isle Biome size increases with BiomeSize value.
If you set the maximum possible value ( GenerationDepth ) the remaining part of the outer biome will be a “border” of approximately one chunk width.
In fact, the boundary law for Borders and Isles is exactly the same. If you take a Biome A and put a Border B and an Isle C in it with BiomeSizeB = BiomeSizeC, Biome A will completely disappear under the two others.
BiomeRarity has an influence on surface distribution here (see next chapter). Also, if there are several Isle Biomes in the same Biome, they will not compete in order to appear (contrary to normal biomes). My theory is that the generator will put the Isle Biome which ID is lowest first (Biome IDs are integers, indicated in WorldConfig.ini).
NotBorderNear is a list of biomes you don’t want the border biome to touch. It works only on border biomes, so there is no simple way to prevent two normal biomes to share a boundary.
BiomeRarity
Back to top For normal Biomes: biomes of the same size class compete in order to appear on the map. Their BiomeRarity value will be used to weigh their probability of appearance. The value for BiomeRarity can go from 0 to BiomeRarityScale .
For Border Biomes: no effect. If several borders are set for the same biome, they will simply stack without overlapping. The first border drawn will be on the outside of the base biome, then the second one will be drawn on the outside of the remains of the base biome and so on. Their order is probably the same as their biomeID order.
For Isle Biomes: I generated several maps and used the ImageJ software with the 3D Color Inspector plugin in order to determine the surface distribution for each color. After eliminating the values for the other biomes represented in the map, these are my results (with the Border BiomeSize equal to GenerationDepth ):
| Rarity | Measured covered area | Likely theoretical covered area |
|---|---|---|
| 100 | 99% | 100% |
| 99 | 49% | 50% |
| 98 | 22.5% | 25% |
| 97 | 12% | 12.5% |
As you can see, every decrease of 1 point from 100 divides the surface distribution of the biome by 2. Unfortunately, BiomeRarity must be an integer so it’s not possible to fine-tune it in order to have precise values such as 75% with just one biome.
There is a workaround for this, though. You can make a copy of the Isle biome file (with a different name, of course) with exactly the same settings except for BiomeRarity . If for instance you want it to cover 75% of the area, give BiomeRarity a value of 99 (50%) in the first Isle biome and 98 (25%) for the clone biome. Their total surface will be 50%+25% = 75%. (Not sure whether this works but it should).
Note: I am not sure yet whether LandRarity works the same way or not.
BiomeColor
Back to top BiomeColor is used when you make a map in FromImage mode. I’m not covering this part for now as mysource’s tutorials explain an acceptable part of it. Using FromImage is highly recommended when you create the settings for your biomes (as you won’t have to search for them). Nonetheless here is a link for hexadecimal colors in case you want to create a FromImage template: http://www.allprofitallfree.com/color-wheel2.html
RiverBiome
Back to top Pretty much straightforward. Specifies what biome is used as river in this biome. Leave blank to disable rivers in this biome.
BiomeTemperature and BiomeWetness
Back to top Those two variables alter the foliage and grass color through the biome diagram.
Low temperature values (like 0.15, I haven’t looked for the limit temperature as of yet) will make your biome a snow biome.
ReplaceToBiomeName
Back to top This one is important. If you give your map to someone who doesn’t have TerrainControl, or if people on your server who don’t have TerrainControl, the biome will pretend to be one of the default biomes. The utility of this is mainly consistency with the colors of sky, water, foliage and grass.
BiomeHeight
Back to top Everything from BiomeVolatility to Volatility2 has value 0.0
VolatilityWeight1:0.5
VolatilityWeight2:0.45
BiomeHeight influences what will be the zero floor level for this biome. If the Biome is flat the main altitude will be determined by this variable.
Changes with BiomeHeight :
| BiomeHeight | Most represented block level |
|---|---|
| -4.0 | <0 |
| -3.62 | 3 |
| -3.6 | 6 |
| -3.5 | 10 |
| -3.0 | 24 |
| -2.001 | 60 |
| -2.0 | -∞ ? |
| -1.999 | 62 |
| -1.99 | 62 |
| -1.9 | 62 |
| -1.8 | 66 |
| -1.5 | 77 |
| -1.0 | 94 |
| 0.0 | 128 |
| 1.0 | 161 |
| 2.0 | 193 |
| 3.0 | 227 |
| 3.5 | 240 |
| 3.62 | 247 |
| 4.0 | 255 |
This is only useful for relative altitude between biomes and according to the water level.
FractureHorizontal and FractureVertical
Back to top Those two values appear in the WorldConfig.ini file. If you change them, they will have an effect on all the biomes.
BiomeVolatility
Back to top Everything else from BiomeHeight to Volatility2 has value 0.0
VolatilityWeight1:0.5
VolatilityWeight2:0.45
Changes with BiomeVolatility :
| BiomeVolatility | Height amplitude |
|---|---|
| <-0.11 | inverted world : air and land are swapped |
| -0.11 | Ultra flat |
| -0.01 | rather flat |
| 0.0 | almost flat |
| 0.25 | Hills reaching about +20 |
| 0.5 | Hills reaching about +30 |
| 0.75 | Hills reaching about +100 |
| 1.5 | Extreme Hills |
| 3.0 | Ultra Hills |
| 5.0 | Liquid |
| 10.0 | Liquid |
Note: BiomeVolatility seems to have no effect near the (0,0) coordinates for values near zero.
MaxAverageHeight and MaxAverageDepth
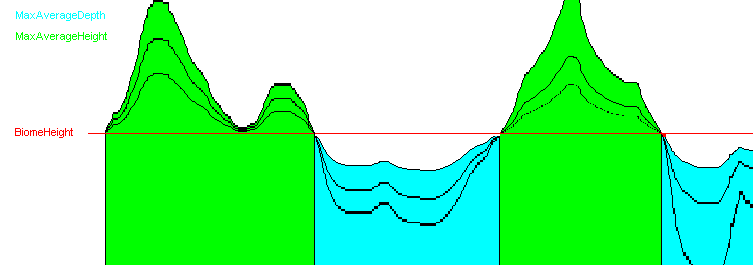
Back to top MaxAverageHeight behaves like a multiplicator applied to the height levels only for the part of the map that is above BiomeHeight .
MaxAverageDepth is very similar to MaxAverageHeight except it works for slopes going down, i.e. the changes in altitude that go from BiomeHeight or any other lower value to any other lower value.
Example: with BiomeHeight:0.0 (block level about 128), MaxAverageDepth would concern slopes from 120 to 90, from 127 to 90, and from 87 to 20.
A slope that goes from 140 to 120 for instance is split into 2 slopes from 140 to 128 and 128 to 120. The first one will be concerned with MaxAverageHeight and the other with MaxAverageDepth .
In this graph, all slopes in green are considered going up and will be amplified or attenuated according to MaxAverageHeight . The blue ones are altered with MaxAverageDepth .
Important: MaxAverageHeight depends on BiomeVolatility . It works only when BiomeVolatility is not zero. Every other value from BiomeHeight to Volatility2 has value 0.0 except for BiomeVolatility:0.1 because 0.0 would cancel MaxAverageHeight ’s effect.
VolatilityWeight1:0.5
VolatilityWeight2:0.45
Changes with MaxAverageHeight :
| MaxAverageHeight | Block level reached by slopes |
|---|---|
| -50.0 | 42 |
| -20.0 | 94 |
| -10.0 | 108 |
| -5.0 | 116 |
| -1.0 | 128,calm |
| 0.0 | 128 |
| 5.0 | 136 |
| 10.0 | 149 |
| 20.0 | 167 |
| 50.0 | 212 |
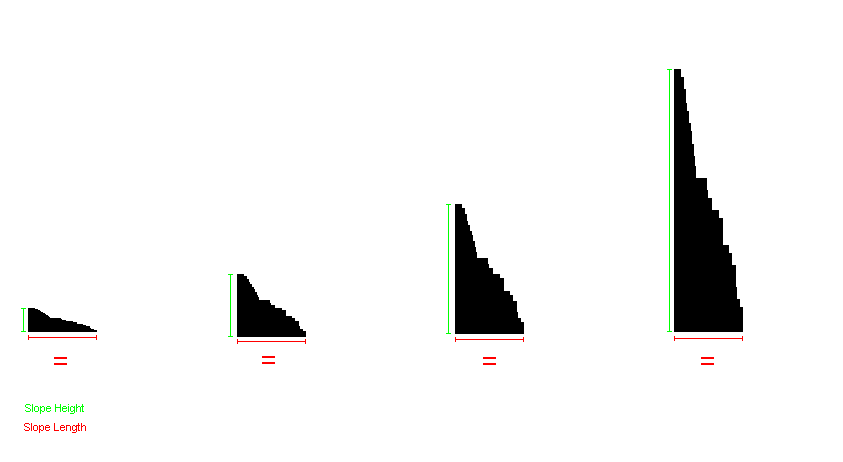
Also, it might be useful to note that MaxAverageHeight is a matter of height in a slope, not length. It means that if you take the same slope in a map generated with two different values of BiomeVolatility , the slope will grow in height, but not in length.
This means that the more you raise MaxAverageHeight , the more likely you will get cliffs in the terrain. In the same manner, raising MaxAverageDepth will eventually make pits in your terrain.
Volatility1 and Volatility2
Volatility1 and Volatility2 both depend on BiomeVolatility . They work only when BiomeVolatility is not zero (which probably means there’s a multiplicator somewhere, so a change in BiomeVolatility will probably create a big change in the effect of Volatility1/2 ). It’s difficult to describe in a few words so I’ll just let the tables explain for me.
Changes with Volatility1 :
| Volatility1 | Effect |
|---|---|
| <0 | No effect |
| 0.0 | Normal |
| 1.0 | Terrain slopes are a little unpredictable, they can be gentle or rough and make cliffs. There can be hungover pieces of land. |
| 10.0 | Pieces of dirt in the air and rather flat ground areas. A very “liquid” look in some areas. |
| 20.0 | Some plains and then some holes and high mountains. Some of the mountains can go up to 200 blocks high. They are thick and rarely crossed by tunnels, but there can be bridges between them above 128 height. |
| 100.0 | Gives a system of very deep and high caves until height 128, from which you can find some plateaus. Where there are no plateaus, the floor can dive down to bedrock. Upwards there are extreme mountains pretty much looking like Skylands with shelves every 16 blocks down from top layer. But the most interesting is certainly the shards everywhere through the air. Give it a try, it’s worth looking. |
| 500.0 | Not so different from 100.0. |
Changes with Volatility2 :
| Volatility2 | Effect |
|---|---|
| <0 | No effect |
| 0.0 | Normal |
| 1.0 | Some hills |
| 5.0 | Some areas remain flat but some spots have become extreme. There are also rifts. |
| 10.0 | Still some flat areas. The extreme spots are even more extreme. |
| 100.0 | The terrain reaches layer 256 and can also go down to 0. The mountains are massive with a very liquid look and many galleries go through them but there still are some areas; it looks like Volatility2 doesn’t work everywhere. Unlike with Volatility1, there are no shards mid-air. |
| 500.0 | Not so different from 100.0. |
CustomHeightControl
Back to top CustomHeightControl is a tool for enabling/disabling some strata. On WorldHeightBits:8 , there are 33 strata which makes them roughly 7.7 blocks thick each (this raises a big question by the way: why not a whole number of blocks ?). The first number is for the lowest stratum and the last one is for the top one.
The comments in the file explain how it should be used pretty well so I’m just going to paraphrase them: positive values will increase the chance of block spawning and negative values will decrease it.
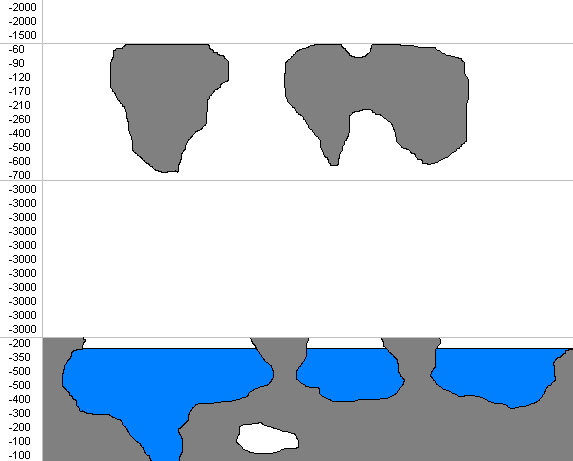
Like many other variables, this set of variables seems to act like a multiplicator. This one is very difficult to quantify and I have not thought of a method for this as of yet, so this is an example of one of my biomes called SkyDrops that uses CustomHeightControl : CustomHeightControl:
-100.0,-100.0,-200.0,-300.0,-400.0,-500.0,-500.0,-350.0,-200.0,-3000.0,-3000.0,-3000.0,-3000.0,-3000.0,-3000.0,-3000.0,-3000.0,-3000.0,-3000.0,-3000.0,-700.0,-600.0,-500.0,-400.0,-260.0,-210.0,-170.0,-120.0,-90.0,-60.0,-1500.0,-2000.0,-2000.0
There are many other settings that make SkyDrops a special biome but what CustomHeightControl does here is that it kills off every landmass in the strata that appear in red, while it gives shape to the strata in blue. Here is a scheme:
Keep in mind that the other values in my SkyDrops biome file are not default (it has a very high BiomeVolatility ). Of course, if I used negative values here but positive values would have added landmass instead of removing it.
I’m thinking that maybe a good way to comprehend CustomHeightControl is this: let’s say you have a column naturally formed in your terrain. Using positive CustomHeightControl values will make the column more fat, and negative values will make it thinner.
SurfaceBlock and GroundBlock
Back to top Those values are meant to give the general appearance to your biome: use the block IDs for Surfaceblock and Groundblock . SurfaceBlock concerns the top layer of ground (generally grass) and 'GroundBlock gives value to the 3 (sometimes 4) block layers underneath it (generally dirt). Those variables cannot replace the stone underground; use ReplacedBlocks` instead.
UseWorldWaterLevel
Back to top Determines whether this biome should be filled with water at WorldWaterLevel. If this is set to false, there will be water between WaterLevelMin and WaterLevelMax . In both cases, underground structures, caves and canyons will not be filled with water because they are dug into the terrain after terrain generation. Be careful: if two biomes that share a boundary that reaches below world water level and one of them has UseWorldWaterLevel set to true and the other biome has it set to false, you will have a wall of water at the boundary. This can be avoided by creating borders that will help for the transition.
ReplacedBlocks
Back to top ReplacedBlocks:(GRASS,DIRT,100,128),(GRAVEL,GLASS) means:
- Between layers 100 and 127 included, replace all grass blocks to dirt blocks.
- Replace all gravel blocks with glass blocks.
This is applied before resource generation, so if for instance you replace all stone with, say, dirt, you will have to change occurences of stone with dirt or the ores won’t be able to generate.
Biome visual settings
Back to top SkyColor , WaterColor , GrassColor and FoliageColor. These allow you to change the colors, like it says. Note that GrassColor and FoliageColor will override the grass and foliage colors that are normally determined by BiomeTemperature and BiomeWetness. Here is a tool for converting colors into hexadecimal values: http://www.allprofitallfree.com/color-wheel2.html
Credits
Back to top mysource for the tutorials that helped me put the first toe in TerrainControl.
The settings explained
Variable names
This is a quick note about variable names to help you understand them faster.
Most variables named somethingRARITY are in fact somethingPROBABILITY . The higher the number the more of that thing you get.
When it comes to most of the variable named somethingSIZE , the higher the number the smaller the thing. It works a bit like a fraction denominator: "1/65" "1/39" "1/2".
For most of the variables named somethingHEIGHT they work like exponent so they are not linear. If you raise the number from 4 to 5 you will get a MUCH bigger result than if you raise it from 1 to 2. So be careful with them.
Also note that some variable have effect on each other. Particularity those of the Biome Generator section. To really see there effect you could use the /tc map command and try changing them.
Remember that this is just a quick note. For more detailed information about variable see the other configuration files information pages.
WorldConfig
The WorldConfig.ini is the main settings file used by the TerrainControl plugin. It controls most of the biome placement, cave and canyon distribution, structure spawning and some other settings. Settings that are biome specific can be found in the BiomeConfigs. On the following page the settings of this file will each be explained in detail.
Jump to
- Generator modes
- Custom biomes
- Settings for BiomeMode:Normal
- Settings for BiomeMode:FromImage
- Terrain height and volatility
- Blocks
- Structures
- World visual settings
- Cave variables
- Canyon variables
- Settings for BiomeMode:OldGenerator
Generator modes
Back to top SettingsMode: WriteAll
Normally, each time Terrain Control reads the config files, it also writes to them. With this setting you can change how Terrain Control writes to the config files. Possible modes:
- WriteAll - Autoupdate settings from old versions, order them, add comments, reset invalid settings and remove custom comments.
- WriteWithoutComments - Same as WriteAll, but removes all comments, both the ones of Terrain Control and your own.
- WriteDisable - Don't write to the comment files. Errors are not corrected, old settings are read, but they are also not corrected. Custom comments won't be removed with this mode.
TerrainMode: Normal
These are different generators that can be used to generate your terrain.
- Normal - This mode uses all the features of the terrain generator. Biomes still look like the ones in vanilla Minecraft.
- OldGenerator - This generator will generate the terrain in the way the Minecraft Beta 1.7.3 terrain generator created it.
- TerrainTest - This generator creates terrain normally but adds no resources. Is faster than Normal.
- NotGenerate - This setting will create empty chunks of terrain.
- Default - This generator creates default terrain. Except the biomes, all the mod settings are ignored.
BiomeMode: Normal
Here you can define how Biomes are to be generated. The following settings are available:
- Normal - Uses all features of Terrain Control. Even with the default settings your biomes will be placed diffently than vanilla Minecraft.
- FromImage - Reads the biomes from an image file. See 'Biome Image Generator Variables' below for more information.
- BeforeGroups - Minecraft 1.0 - 1.6.4 biome generator, only supports the biome groups NormalBiomes and IceBiomes
- OldGenerator - Generates biomes like in Minecraft Beta 1.7.3.
- Default - Means the default biome generator of vanilla Minecraft will be used.
Custom biomes
(回到顶部请使用“Home”按钮,下同) CustomBiomes:
You need to register your custom biomes here. This setting will make Terrain Control generate and read the setting files for them. However, it won't place them in the world automatically. See the settings for your BiomeMode below on how to add them to the world.
Syntax: CustomBiomes:BiomeName:id[,AnotherBiomeName:id[,...]]
Example: CustomBiomes:TestBiome1:30,BiomeTest2:31
This will add two biomes and generate the BiomeConfigs for them. All changes here need a server restart.
Due to the way Mojang's loading code works, all biome ids need to be unique on the server. If you don't do this, the client will display the biomes just fine, but the server can think it is another biome with the same id. This will cause saplings, snowfall and mobs to work as in the other biome.
The available ids range from 0 to 1023, inclusive. Minecraft 1.7 uses most IDs between the ranges of 0-39 and 129-167. Using those IDs is not possible. It is recommend to leave some room around the vanilla IDs in case new biomes are added in the future.
IDs above 255 can not be saved by Minecraft. You will need to add a ReplaceToBiomeName setting to those biomes to make sure that they are saved to the world files using an id below 256.
Settings for BiomeMode:Normal
The values in this section only work when BiomeMode is set to Normal or BiomeMode is FromImage and ImageMode is ContinueNormal
GenerationDepth:10
Main value for generation. Bigger values 'zoom in', so that the biomes get larger:
All sizes ( *Size ) must be smaller than this.
So if you want big objects (biomes/rivers/etc.) you must set size of that objects near 0.
If you want small objects you must set size of the objects near GenerationDepth .
Also small values (about 1-2) and big values (about 20) may affect generator performance.
A tutorial (by thedeadlytao) about GenerationDepth , LandSize and LandRarity can be found here.
BiomeRarityScale:100
Max biome rarity from 1 to infinity. By default this is 100, but you can raise it for fine-grained control, or to create biomes with a chance of occurring smaller than 1/100.
Biome groups
Minecraft groups similar biomes together, so that they spawn next to each other. Most biomes in the world (but not all) spawn as part of a biome group.
Syntax: BiomeGroup(Name, Size, Rarity, BiomeName[, AnotherName[, ...]]) Name - just for clarity, choose something descriptive Size - layer to generate on, from 0 to GenerationDepth. All biomes in the group must have a BiomeSize larger than or equal to this value. Rarity - relative spawn chances. BiomeName... - names of the biome that spawn in the group. Case sensitive.
Note: if (and only if) you're using BiomeMode: BeforeGroups , only the biomes listed in the groups named NormalBiomes and IceBiomes and the size and rarity of the group named IceBiomes will be used. Other groups are ignored. The size and rarity of the NormalBiomes group is ignored as well, use LandSize and LandRarity instead.
Default biome groups:
BiomeGroup(NormalBiomes, 0, 97, Forest, Roofed Forest, Extreme Hills, Plains, Birch Forest, Swampland, Flower Forest, Roofed Forest M, Extreme Hills+, Sunflower Plains, Birch Forest M, Swampland M)
BiomeGroup(IceBiomes, 3, 90, Ice Plains, Cold Taiga, Ice Plains Spikes, Cold Taiga M)
BiomeGroup(HotBiomes, 0, 97, Desert, Savanna, Plains, Desert M, Savanna M, Sunflower Plains)
BiomeGroup(ColdBiomes, 0, 97, Forest, Extreme Hills, Taiga, Plains, Flower Forest, Extreme Hills+, Taiga M, Sunflower Plains)
BiomeGroup(MesaBiomes, 1, 40, Mesa)
BiomeGroup(JungleBiomes, 1, 40, Jungle, Jungle M)
BiomeGroup(Mega TaigaBiomes, 1, 40, Mega Taiga, Mega Spruce Taiga)
Biome lists
Not all biomes spawn as part of a group. Some biomes spawn as "isles" in other biomes, or as borders on other biomes.
IsleBiomes: Deep Ocean, MushroomIsland, Ice Mountains, DesertHills, ForestHills, Forest, TaigaHills, JungleHills, Cold Taiga Hills, Birch Forest Hills, Extreme Hills+, Mesa Plateau, Mesa Plateau F, Mesa Plateau M, Mesa Plateau F M, Mesa (Bryce), Mega Taiga Hills, Mega Spruce Taiga Hills
Biomes which used as isles. Biome name is case sensitive. Inside the biome config of the biome you can decide in which biome this isle should spawn. Please note that the Hills-biomes are actually 'islands' inside a biome. Jeb_ has done this in Minecraft 1.1 to make the terrain generator more interesting: players were complaining that the biomes were too flat.
BorderBiomes: MushroomIslandShore, Beach, Extreme Hills Edge, Desert, Taiga
Biomes that are used as borders. Biome name is case sensitive. In the biome config of the biome you can specify next to which biome this border should spawn. You can also set there next to which biome this border should not spawn.
Landmass settings
LandRarity: 97
Land rarity from 100 to 1. Higher numbers give more land. Values are quite sensitive, look at the image. Set it to 100 to completely disable oceans.
As you can see the oceans are completely gone with LandRarity:100 .
LandSize: 0
Land size from 0 to GenerationDepth . Making LandSize larger will make the size of the land smaller.
LandFuzzy: 6
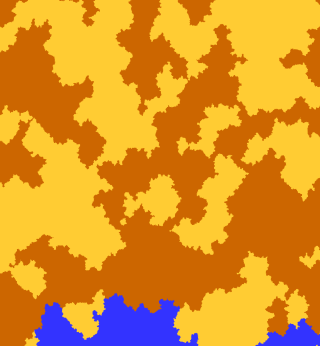
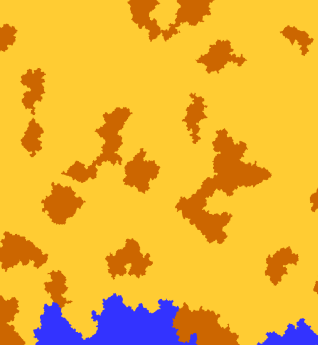
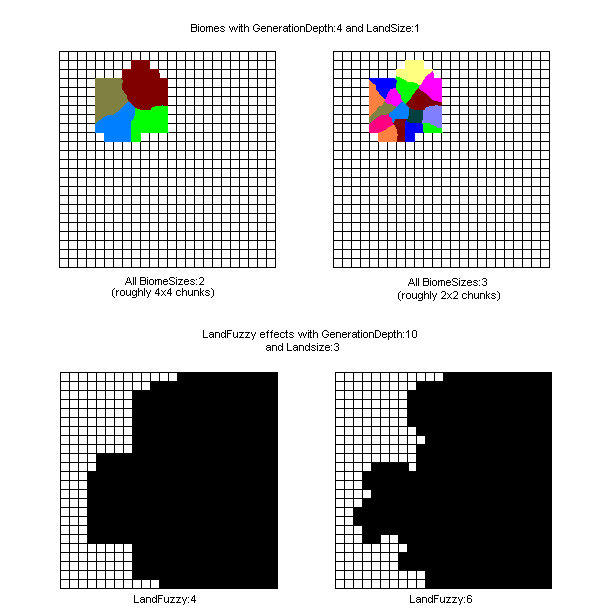
Generates more lakes (=small ocean biomes) at the edge of the continent. As a side effect, the continent will also get a bit larger. Must be from 0 to GenerationDepth - LandSize . Map of the edge of a continent:
Ice area settings
FrozenOcean:true
Make the water of the oceans near a cold biome frozen. The exact definition of 'cold' is controlled by the next setting.
OceanFreezingTemperature: 0.15
This is the maximum biome temperature when a biome is still considered cold. Water in oceans nearby cold biomes freezes if FrozenOcean is set to true. Temperature reference from vanilla Minecraft: < 0.15 for snow, 0.15 - 0.95 for rain, or > 1.0 for dry
FreezeAllBiomesInColdGroup: false
If the average of all biome temperatures in a biome group is less than "OceanFreezingTemperature", then:
- When this setting is true, all biomes in the group will have frozen oceans
- When this setting is false, only individual biomes with a temperature below "OceanFreezingTemperature" will have frozen oceans
River settings
RiverRarity:4
River rarity. Must be from 0 to GenerationDepth .
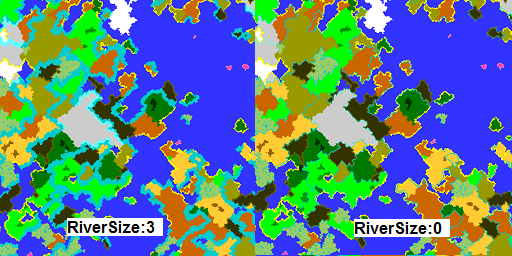
RiverSize:0
River size from 0 to GenerationDepth - RiverRarity . Making this larger will make the rivers larger, without affecting how much rivers will spawn.
RiversEnabled:true
Enable or disable rivers. If you just want rivers in some biomes, set this to true and disable the rivers in the BiomeConfigs instead.
RandomRivers:false
Normally the rivers follow the biome borders most of the time. Set this setting to true to disable this behaviour.
ImprovedRivers:false
Normally rivers use technical biomes to generate. In the default settings the biomes River and FrozenRiver are used.
If you set this setting to true, the technical biomes won't be used anymore in the world. This causes the rivers to look exactly like the biome they are flowing through: no more sudden changes of grass color. The height settings of the river can now be found in the biome the river is flowing through.
Settings for BiomeMode:FromImage
The values in this section only work when BiomeMode is set to FromImage.
ImageMode:Repeat
What to do when terrain is generated outside the boundaries of the image: Repeat , ContinueNormal , FillEmpty
Repeat - repeat the image.
Mirror - mirrors the image.
ContinueNormal - continue normal generation.
FillEmpty - fill it with one biome.
ImageFile:map.png
PNG file to read the biomes from. Place it next to the WorldConfig.ini file.
ImageOrientation: East
How the image is oriented: North , South , East or West . When this is set to North , the image is placed in the world in the normal way. When it is set to East , the image is rotated 90 degrees counter-clockwise in memory so, that what is on the east in the image becomes north in the world.
ImageFillBiome:Ocean
When using the FillEmpty mode this biome will be used when generating outside the image.
ImageXOffset:0
ImageZOffset:0
Translates the map origin. For some reason, this number needs to be multiplied with -1 when using FillEmpty .
BiomeConfigs
PluginConfig
BO2 Objects
BO3 Objects
Land Fuzzy
Other pages
Examples page
Commands and Permissions
Compatibility with other mods
Compatibility with WorldPainter
External tutorials
- General tutorial by mysource
- Effect of the seed on a map and working with higher (y>128) worlds by mysource
- Achieve certain world styles by mysource
- Create a map by image by mysource
- World merging by mysource
- How Terrain Control's biome generator works by Khoorn
- Cave variables explained by thedeadlytao
- GenerationDepth and LandSize/Rarity Explained by thedeadlytao

